什么是nginx?
Nginx是一款轻量级的Web 服务器/反向代理服务器及电子邮件(IMAP/POP3)代理服务器。
什么是反向代理?
反向代理的概念:更多的属于端口转发的功能,用户A,访问服务器B的nginx,nginx会反向代理到目标数据,然后返回给用户。用户此时是不知道目标数据来自哪里的!也就常用的proxy_pass 的功能!可见:https://www.zanglikun.com/8495.html
Nginx能做什么?
Nginx 反向代理、负载均衡、动态分离、集群高可用
优点:参考于:https://moonbingbing.gitbooks.io/openresty-best-practices/content/ngx/nginx_brief.html
- Nginx支持高达10w的并发量,实际取决于内存,10万并不是上限
- 避免暴露服务器真实位置(所有请求都到nginx了,nginx代理访问服务器)
- 解决前端跨域问题(由nginx负责压力)
- 热部署(面试点):nginx启动会启动master管理进程、work工作进程,我们修改配置文件文件就是重启master管理进程,但实际work还在运行中。就实现了7x24不间断运行!
- 低内存:在一般的情况下,10000 个非活跃的 HTTP Keep-Alive 连接在 Nginx 中仅消耗 2.5MB 的内存,这也是 Nginx 支持高并发连接的基础。
- 高拓展性:低耦合支持大量第三方库,比如ssl等
Nginx是一个高性能的反向代理、Http服务器软件 占用内存少 并发强
Nginx为什么快?
- nginx是基于epoll模型开发的,而epoll是基于JAVA NIO的同步非阻塞开发,在高并发情况下能支持更多的连接!
- nginx是事件驱动的,一个主进程跟多个工作进程组成的工作模式,主线程负责循环分配事件,多个工作线程负责事件的处理!
Nginx反向代理含义:
- 正向代理:在客户端配置代理服务器,通过代理服务器进行访问资源。依赖代理服务器进行访问资源
- 反向代理:客户端对正向代理是无感知的,反向代理可用实现,暴露代理服务器,隐藏真实服务器IP。
Nginx负载均衡含义:
请求作为负载 将请求分发到多台服务器,让多台服务器共同响应,即 服务器按照规则平均分发请求。避免单一服务器响应不过来。
Nginx 动态分离:
为了加快服务器的解析速度,可用通过动态(jsp)、静态的资源(html、css、js)分开的方式
Nginx是静态资源服务器,不能够处理动态资源哦,请求到动态资源,可以通过proxy_pass、fastcgi_pass转发
proxy_pass 与fastcgi_pass 有什么共异性?

共同点:
    都作为代理,代理后端服务分发使用
不同点:
    proxy_pass 应用更广泛,支持几乎所有应用
    fastcgi_pass 后端只能代理fastcgi服务器应用可运行的语言

    proxy_pass   支持(4个) ip、ip:端口、socket、uri

    fastcgi_pass 支持(3个) ip、ip:端口、socket
Nginx 安装
CentOS 安装
yum install -y nginxMac安装
brew install nginx输出
The default port has been set in /opt/homebrew/etc/nginx/nginx.conf to 8080 so that
nginx can run without sudo.
Windows安装
Windows不需要去安装,直接下载使用即可Linux编译安装 官网下载安装
从官网下载 Linux 安装包源码实际上默认很多Nginx模块是缺失的,需要我们手动添加上去,所以常规使用很不推荐源码编译方式安装,源码编译只适用于自定义Nginx功能
安装一些Nginx源码编译环境与其他依赖。不安装环境,是无法完成Nginx编译的
yum -y install make zlib zlib-devel gcc-c++ libtool openssl openssl-devel解压nginx源码包的命令:tar -xvf
tar -zxvf 包名用来生成 Makefile,为下一步的编译做准备
编译的模块时参数在:http://nginx.org/en/docs/configure.html
# 进入你解压出来的文件夹
cd /xxx/xxx/nginx

# 下面是编译Nginx开启XX模块功能
./configure
./configure --with-http_ssl_module  # 开启SSL模块
./configure --with-stream # 开启UDP、TCP端口转发
./configure --with-http_realip_module # 获取客户端的真实IP
# 混合编译配置
./configure --with-http_ssl_module --with-stream --with-http_realip_module

# 可以同时选多个模块 如 --ABC --EFG,这里我直接给出最新的Nginx模块

# 注意一点:Nginx可以指定Nginx安装的位置,你可以拿出来,放到任何服务器上使用!
./configure --prefix=/root/nanw-test/nginx-move

# 其他功能

./configure --with-http_addition_module --with-http_auth_request_module --with-http_dav_module --with-http_degradation_module --with-http_flv_module --with-http_gunzip_module --with-http_gzip_static_module --with-http_mp4_module --with-http_random_index_module --with-http_realip_module --with-http_secure_link_module --with-http_slice_module --with-http_ssl_module --with-http_stub_status_module --with-http_sub_module --with-http_v2_module --with-mail --with-mail_ssl_module --with-pcre --with-pcre-jit --with-stream --with-stream_realip_module --with-stream_ssl_module --with-stream_ssl_preread_module --with-http_ssl_module
编译完成后执行安装:make && make install 走一遍(不管爆不爆错,只要最后 install成功就行,如果 不成功,具体还需要百度研究下)
make
make test
make clean
make install
Nginx编译字段
install 后,需要 查看一下当前版本 nginx -V
如果安装成功了,并且是默认安装位置:可以通过 /usr/local/nginx/sbin/nginx -V 查看已经启用的模块

# 下面是Nginx1.24.1版本命令示例:
[root@localhost sbin]# ./nginx -V
nginx version: nginx/1.24.0
built by gcc 9.3.1 20200408 (Red Hat 9.3.1-2) (GCC)
built with OpenSSL 1.0.2k-fips  26 Jan 2017
TLS SNI support enabled
configure arguments: --with-http_ssl_module --with-stream --with-http_realip_module
操作Nginx(基础版)
查看Nginx版本
# 直接执行下面命令
/usr/local/nginx/sbin/nginx -v
放行防火墙 - 重启防火墙
开放80 与 443防火墙端口
 firewall-cmd --zone=public --add-port=80/tcp --permanent
 firewall-cmd --zone=public --add-port=443/tcp --permanent
放行了防火墙后,只有重启生效防火墙配置,重启命令如下:
firewall-cmd --reload
卸载 Nginx
抄自网络,但是 不确保删的干净。烦,具体情况具体对待
删除nginx目录即可 建议使用 whereis nginx 查看一下nginx所在的地址

rm -rf /opt/nginx

(rm -rf /usr/local/nginx)

如果配置了自启动,也需要删除
Nginx常用命令
下文使用条件必须进入nginx目录中去
即 /usr/lcoal/nginx/sbin目录
cd /usr/local/nginx/sbin/
查看NG版本号
进入上面的才可以查看nginx版本号
./nginx -v
启动nginx
启动nginx (不保证nginx一定能启动成功 如果服务器安装了Apache 等一些 WEB服务器 可能会nginx使用的端口占用导致无法启动)
./nginx
关闭nginx
./nginx -s stop
重载nginx配置文件
./nginx -s reload
检测nginx配置文件
nginx的配置文件在:/usr/lcoal/nginx/conf/nginx.conf 或者 /etc/nginx/nginx.config
如果找不到nginx配置文件位置怎么办?活人是不能让尿憋死的,记得,nginx 自检配置文件,就会打印出来 配置文件的位置。你也可以尝试使用whereis nginx来尝试看下
./nginx -t
Nginx(引用)别的配置文件,避免主文件过长
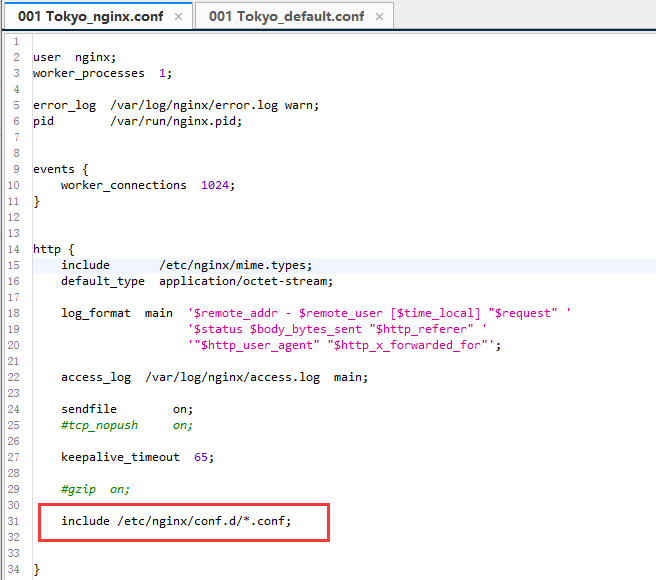
使用方式:在主Nginx配置文件的http块,引用其他文件配置如下:include /abc/*.conf
这里说一下主Nginx配置文件: /etc/nginx/nginx.config 配置文件中 引用了其他的配置文件

所以 他还需要去读取 /etc/nginx/conf.d/*.conf 下面的所有文件
正好有个叫 default.conf

配置文件的组成 default.conf 完整的内容
server {
    listen       80;
    server_name  localhost;

    #charset koi8-r;
    #access_log  /var/log/nginx/host.access.log  main;

    location / {
        root   /usr/share/nginx/html;
        index  index.html index.htm;
    }

    #error_page  404              /404.html;

    # redirect server error pages to the static page /50x.html
    #
    error_page   500 502 503 504  /50x.html;
    location = /50x.html {
        root   /usr/share/nginx/html;
    }

    # proxy the PHP scripts to Apache listening on 127.0.0.1:80
    #
    #location ~ \.php$ {
    #    proxy_pass   http://127.0.0.1;
    #}

    # pass the PHP scripts to FastCGI server listening on 127.0.0.1:9000
    #
    #location ~ \.php$ {
    #    root           html;
    #    fastcgi_pass   127.0.0.1:9000;
    #    fastcgi_index  index.php;
    #    fastcgi_param  SCRIPT_FILENAME  /scripts$fastcgi_script_name;
    #    include        fastcgi_params;
    #}

    # deny access to .htaccess files, if Apache's document root
    # concurs with nginx's one
    #
    #location ~ /\.ht {
    #    deny  all;
    #}
}
所以 他的配置页面在 这里 root /usr/share/nginx/html; 进行读取 index.html
一般来说 Nginx配置文件会分成四块
Nginx配置使用 井号# 注释配置
由三部分组成
- 第一块 全局块 配置整体运行的指令
- 第二块 events块 配置用户连接与网络部分
- 第三块 Http块 配置最频繁的部分
Http块 包含了http全局块、server块
server才是我们操作的核心
案例一:代理端口转发
实现的效果:在浏览器输入www.123.com跳转到tomcat
server_name 配置好ip或者域名;
在location填写 proxy_pass http://127.0.0.1:8080;
记得一定要加“;”
Bug分析 Nginx配置完成后 发现无法启动
排除配置文件错误后,一般都是Linux服务器的网络配置导致的
经过近40分钟的排查 最终发现Linux配置的时候请修改服务器配置,一行一行的执行下文命令

setenforce 0
sed -i 's/SELINUX=enforcing/SELINUX=disabled/g' /etc/selinux/config
setsebool -P httpd_can_network_connect 1
案例二:通过不同的访问路径跳转到不同的端口 代理路径端口转发
server{
    listen 80;
    server_name www.abc.com;
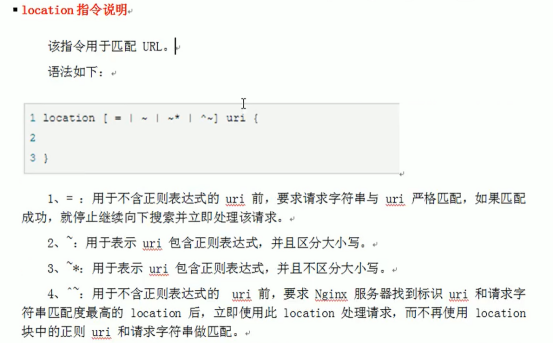
    location ^~ /edu/	{	#在webapps下面创建edu里面放个h5即可
        proxy_pass http://127.0.0.1:8080;
    }
    location ^~ /vod/	{	#在webapps下面创建vod里面放个h5即可
        proxy_pass http://127.0.0.1:8081;
    }
}
这里我建议记录一些常用案例,关于这个localcation的内容,十分的不友好。建议使用GPT复制,尽可能多的描述你的要求的内容!!!

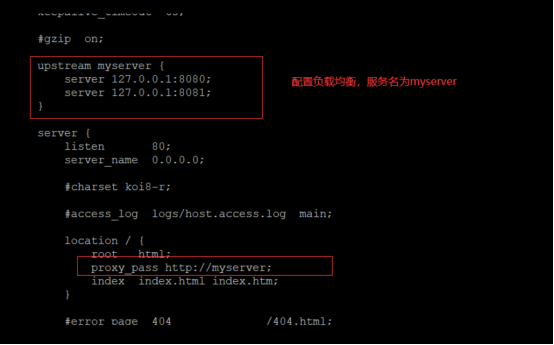
案例三:配置Nginx负载均衡

负载分配策略
在Linux下有Nginx、LVS、 Haproxy 等等服务可以提供负载均衡服务,而且Nginx提供了几种分配方式(策略):。
1、轮询(默认)
每个请求按时间顺序逐一分配到不 同的后端服务器,如果后端服务器down掉,能自动剔除
upstream server_pool{
  server 192.168.5.21:80;
  server 192.168.5.22:80;
}
2、weight (常用)
weight代表权重默认为1,权重越高被分配的客户端越多。
指定轮询几率,weight和访问比率成正比,用于后端服务器性能不均的情况。例如: 。
upstream server_pool{
  server 192.168.5.21:80 weight=5;
  server 192.168.5.22:80 weight=10;
}
3、ip hash
每个请求按访问ip的hash结果分配, 这样每个访客固定访问一个后端服务器,可以解诀session的问题。例如:
upstream server_pool{
  ip_ hash;
  server 192.168.5.21:80;
  server 192.168.5.22:80;
}
4、fair(第三方)
upstream server_pool
{
	server 192.168.5.21:80;
	server 192.168.5.22:80;
	fair;
}
负载均衡还有一个配置,那就是 fail_timeout 也就是 默认失败1次后,暂停使用60秒,失败次数由 max_fairs 决定;
upstream server_pool
{
	server 192.168.5.21:80;
	server 192.168.5.22:80 max_fairs=1 fail_timeout=60s;
}
引用外部文件
就是Nginx会读取/home/java/nginx_confs 文件夹下面的所有.conf文件!
# 在被使用的配置文件引用下面文件
include /home/java/nginx_confs/*.conf;
设置Nginx请求日志
# 在server块添加日志记录,将来日志就会被记录在如下的日志中

    access_log  /www/wwwlogs/www.52zhenliao.com.log;
error_log /www/wwwlogs/www.52zhenliao.com.error.log;上述文章均是作者实际操作后产出。烦请各位,请勿直接盗用!转载记得标注原文链接:www.zanglikun.com
第三方平台不会及时更新本文最新内容。如果发现本文资料不全,可访问本人的Java博客搜索:标题关键字。以获取最新全部资料 ❤

评论(0)