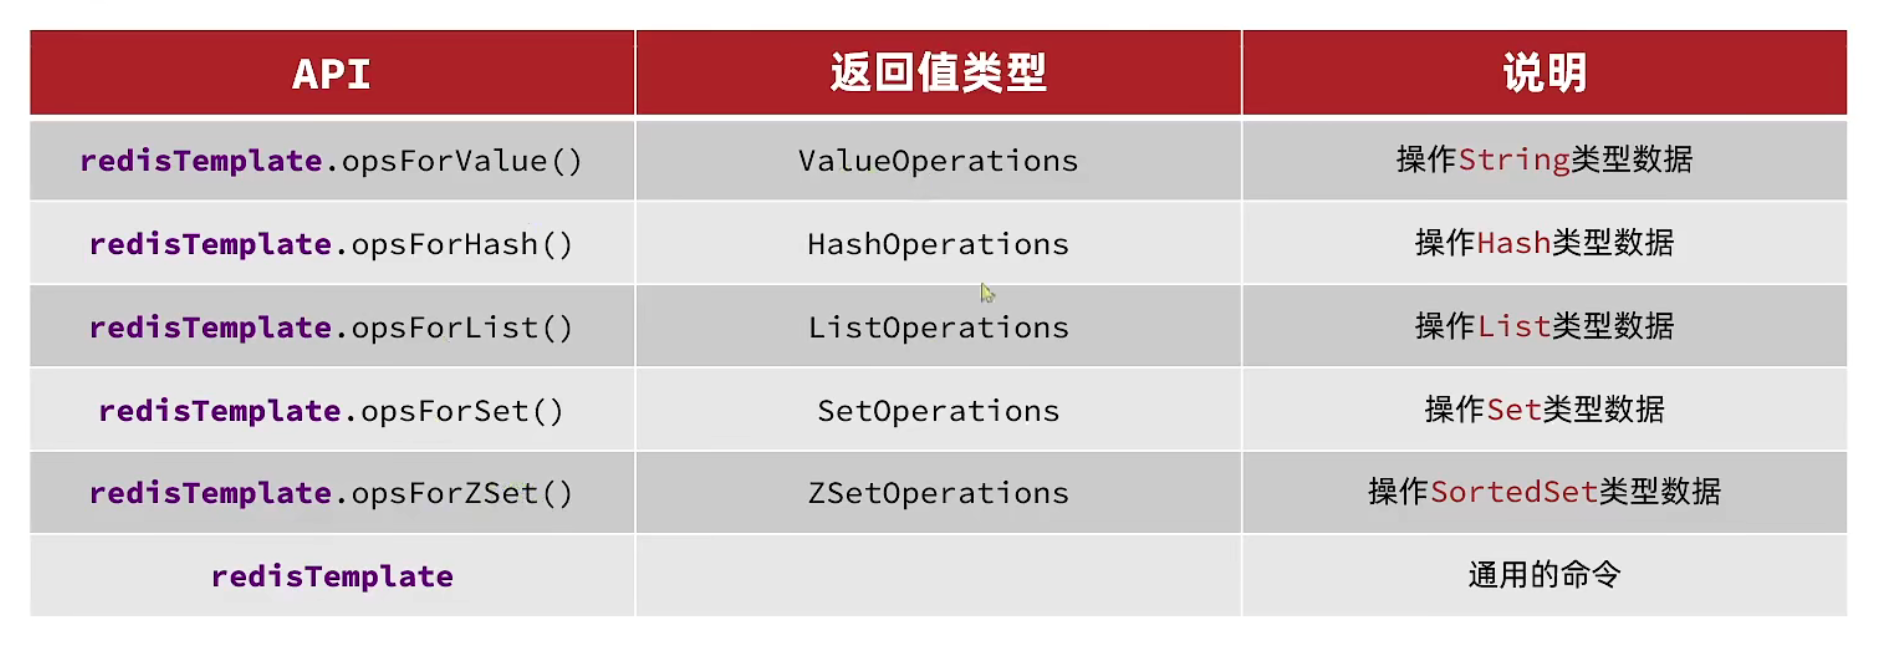
SrpingDataRedis是Spring集成了Redis几乎所有的操作!提供了RedisTemplate的API统一操作Redis https://docs.spring.io/spring-data/data-redis/docs/current/reference/html/
Java 学习Redis地址是:https://developer.redis.com/develop/java/
首先 SpringBoot 的 约定优于配置 在整合Redis的时候 就得到了充分的体现
我们几乎不需要手写什么配置,大部分的配置基于SpringBoot配置好的就行。
SpringDataRedis API快速入门

上述API 分开了Redis对不同数据类型的操作,如:我要操作String类型的命令,直接redisTemplate.opsForValue() 再去使用其子API!
首先 老规矩,加入 Maven的依赖
        <!-- Redis依赖-->
        <dependency>
            <groupId>org.springframework.boot</groupId>
            <artifactId>spring-boot-starter-data-redis</artifactId>
        </dependency>
        <!-- 连接池依赖-->
        <dependency>
            <groupId>org.apache.commons</groupId>
            <artifactId>commons-pool2</artifactId>
        </dependency>
依赖加入好后,刷新一下 Maven,编写我们的配置信息 .properties格式
# Redis基本信息
spring.redis.host=127.0.0.1
spring.redis.port=6380
spring.redis.password=
spring.redis.database=0
# Redis连接池配置(Spring默认Redis连接池是lettuce,如果使用jedis的连接池还需要引入其他依赖) 依次是:最大连接、最大空闲、最小连接数、连接等待时间
spring.redis.lettuce.pool.max-active=8
spring.redis.lettuce.pool.max-idle=8
spring.redis.lettuce.pool.min-idle=0
spring.redis.lettuce.pool.max-wait=100
然后开始写我们的测试用例了。
我们核心是 RedisTemplate 所有操作 ,都让他来干。
快速入门 Demo
import org.junit.jupiter.api.Test;
import org.springframework.beans.factory.annotation.Autowired;
import org.springframework.boot.test.context.SpringBootTest;
import org.springframework.data.redis.core.RedisTemplate;

@SpringBootTest
class SpringDataRedisDemoApplicationTests {

    @Autowired
    RedisTemplate redisTemplate;

    @Test
    void contextLoads() {
        redisTemplate.opsForValue().set("name", "张三Aa123");
        System.out.println("插入成功!");
        String name = redisTemplate.opsForValue().get("name").toString();
        System.out.println("获取到了name是:" + name);
    }

}
注意:我们用RDM查看一下 我们的Key与Value没有序列化,需要我们看下文的RedisTemplate序列化

RedisTemplate 的序列化与反序列化
RedisTemplate默认使用的是JDK序列化工具,坏处是:可读性差、内存占用大,如快速入门执行后,RDM结果所示,本来就是 name = 张三Aa123,存储后,变成很长的字符了!
        <!-- Redis 序列化依赖-->
        <dependency>
            <groupId>com.fasterxml.jackson.core</groupId>
            <artifactId>jackson-databind</artifactId>
        </dependency>
添加一个配置类
import org.springframework.context.annotation.Bean;
import org.springframework.context.annotation.Configuration;
import org.springframework.data.redis.connection.RedisConnectionFactory;
import org.springframework.data.redis.core.RedisTemplate;
import org.springframework.data.redis.serializer.GenericJackson2JsonRedisSerializer;
import org.springframework.data.redis.serializer.RedisSerializer;

@Configuration
public class RedisConfig {
    @Bean
    public RedisTemplate<String,Object> redisTemplate(RedisConnectionFactory connectionFactory){
        RedisTemplate<String, Object> stringObjectRedisTemplate = new RedisTemplate<>();
        // 设置连接工厂
        stringObjectRedisTemplate.setConnectionFactory(connectionFactory);
        // 创建Json序列化工具
        GenericJackson2JsonRedisSerializer genericJackson2JsonRedisSerializer = new GenericJackson2JsonRedisSerializer();
        // 设置Key的序列化 这里只设置了String类型的,Hash类型的,其他类型,需要额外处理
        stringObjectRedisTemplate.setKeySerializer(RedisSerializer.string());
        stringObjectRedisTemplate.setHashKeySerializer(RedisSerializer.json());
        // 设置Value的序列化
        stringObjectRedisTemplate.setValueSerializer(genericJackson2JsonRedisSerializer);
        stringObjectRedisTemplate.setHashValueSerializer(genericJackson2JsonRedisSerializer);
        return stringObjectRedisTemplate;
    }
}
添加一个 User类 用来 下文 操作 JAVA 对象
import lombok.AllArgsConstructor;
import lombok.Data;
import lombok.NoArgsConstructor;
import lombok.ToString;
import java.io.Serializable;

@Data
@NoArgsConstructor
@AllArgsConstructor
@ToString
public class User implements Serializable {
    private String name;
    private int age;
    private boolean isman;
    private static final long serialVersionUID = 1L;
}
测试代码
    @Test
    void setObject() {
        User user = new User("张三", 21, true);
        redisTemplate.opsForValue().set("user", user);
        System.out.println("插入对象成功");
        User getUser = (User) redisTemplate.opsForValue().get("user");
        System.out.println("获取到的对象信息是:" + getUser);
    }
Redis Desktop Manager 发现存储后:出现了全限定类名了

Demo:去掉全限定类名
思路:去除掉全限定类名后,JDK不知道要反序列化到那个对象,我们唯一的解决办法就是:存储时使用如 fastjson工具 提前序列化好 Key与Value。
伪代码
存:
        Player player = new Player();
        player.setXXX();
        redisTemplate.opsForValue().set("我是Key", JSON.toJSON(player));


读:
        JSONObject obj = (JSONObject)redisTemplate.opsForValue().get("我是Key");
        Player player = JSON.toJavaObject(obj, Player.class);
StringRedisTemplate
StringRedisTemplate 只能对 key=String,value=String 的键值对进行操作。本质实现了RedisTemplate接口,然后添加了Key、Value的序列化而已!节省了手动添加的配置文件!
去参考这个吧:https://www.cnblogs.com/xuqing0422/p/13461281.html
第三方平台不会及时更新本文最新内容。如果发现本文资料不全,可访问本人的Java博客搜索:标题关键字。以获取最新全部资料 ❤

评论(0)